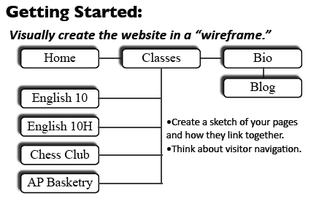
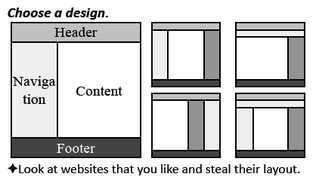
EdTech
  • Welcome!
  • Assessment
    • AAPPL
    • Data Dashboard
    • SAGE Science Information
    • SAGE Math Information
    • SAGE Summative >
      • SAGE Language Arts Information
      • SAGE ELL Information
    • Utah Compose
    • GradeCam
    • Nearpod
    • Pearson Realize >
      • Pearson Realize for Students and Families
      • Pearson enVision 2.0 for Teachers
  • Technology PD
    • Ed Tech Endorsement >
      • Ed Tech Certifications
    • PD Registration
    • Professional Development - ESP
    • UCET
    • 12 Days of Ed Tech Winter
  • Parent Connections
  • Hour of Code
  • Teacher Resources
    • Digital Citizenship Week
    • Keyboarding
    • Annual Canyons District Film Festival >
      • About the Film Festival
      • Film Festival Categories
      • Preparing for the Canyons District Film Festival
      • The Filmmaking Process
      • Film Festival Teacher Resources
      • Film Festival Poster Contest
      • Film Festival American Graduate Strand
      • Other Filmmaking Opportunities
    • Instructional Technology Toolbox >
      • Positive Behavioral Interventions and Supports (PBIS)
  • Contact Us
    • Who do I ask?

Building a Class Website

Designing a Website

Step 1:
A good website starts with a good plan. This means deciding which pages you will create and how they will connect to one another.
Example:
  • In the example below, the row across the top represent the 3 basic pages that are visible and accessible directly from the home page.
  • The secondary pages listed under those 3 primary pages are accessible once you visit that page.
  • Your website can have as many layers as you would like, but a good rule to try to follow is that any information on your site should be accessible with 3 clicks or less. 
Once you have designed your "wireframe" you are ready to start designing the layout for your website.
Picture
Step 2:
Choosing a design is important because it sets the foundation for how your users will access the information on your site.
Example:
The example below shows a few different ideas for how to layout your website.
  • Header: This identifies your website on every page. A header often has some basic navigation links.
  • Navigation (side bars): The navigation pane has links to more of  the pages available on your website. You can also add other links and information in your side bars. Website can have one, two, or even 3 side bars if it helps users navigate the website more effecctively.
Picture
More information can be found on the Website Design page.

Web 2.0 Pages

Web 2.0 HOME
Class Websites
Internet Safety
Google Tools
Social Media
Dropbox
Research Tools
Presentation Tools

Documentation:

Website Design
Weebly Basics

Links:

Weebly
Webs.com
WordPress
Blogger
Google Sites
Yola

Building a Website

Picture
Click for Weebly Basics Page
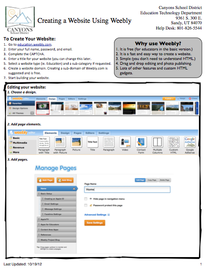
Next, you need to decide on a platform or service to use to create your website. There are hundreds options and you should feel free to choose the one that works the best for you. This website was created using Weebly, which has become fairly common in our school for teacher and student use. It simple to use and with new features added all the time, it is becoming a pretty powerful tool for teacher websites.

The handout on Weebly Basics will give you more information on how to get started.
Or you can use on of the following sites to build your website:
Webs.com
WordPress
Blogger
Google Sites
Yola
This is the part that will take some time, but should be the most fun. Check the tips below for more help, contact your instructors to get more help.

Start a Blog

Picture
Your site blog is where you will share your ideas, thoughts, reflections, and other information with the instructors and other class members.
To create a Blog in Weebly:
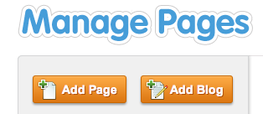
  1. Click on the 'Pages' tab on your Site Builder page.
  2.  Under the 'Manage Pages' heading, select the 'Add Blog' button.
  3. Start a new post by selecting the 'New Post' button.
  4. Build your blog post by adding elements. Blogs have limited editing and layout options, but once you have build a few regular pages, blog pages should be fairly easy to create.
  5. Once your post is finished, click the 'Publish Changes' button and your blog post will be posted on your website. You can always go back and edit or delete a post if needed.

Website Creation Tips

  1. Don't share any personal or identifying information that you aren't comfortable sharing in class. (where you live, your phone number, etc.)
  2. Do make you website look professional and finished.
  3. Depending on the program you use to create your website, take some time to check out some of the features, watch a video tutorial, and learn what you can about how to make your site look just right.

Powered by Create your own unique website with customizable templates.


Our mission is to improve teaching and learning through the use of appropriate technologies,
supporting students in their progress toward college-, career-, and citizenship-readiness.

Creative Commons License

Original content distributed on this website is licensed under a
Creative Commons Attribution-Noncommercial-Share Alike 3.0 United States License.