EdTech
  • Welcome!
  • Assessment
    • AAPPL
    • Data Dashboard
    • SAGE Science Information
    • SAGE Math Information
    • SAGE Summative >
      • SAGE Language Arts Information
      • SAGE ELL Information
    • Utah Compose
    • GradeCam
    • Nearpod
    • Pearson Realize >
      • Pearson Realize for Students and Families
      • Pearson enVision 2.0 for Teachers
  • Technology PD
    • Ed Tech Endorsement >
      • Ed Tech Certifications
    • PD Registration
    • Professional Development - ESP
    • UCET
    • 12 Days of Ed Tech Winter
  • Parent Connections
  • Hour of Code
  • Teacher Resources
    • Digital Citizenship Week
    • Keyboarding
    • Annual Canyons District Film Festival >
      • About the Film Festival
      • Film Festival Categories
      • Preparing for the Canyons District Film Festival
      • The Filmmaking Process
      • Film Festival Teacher Resources
      • Film Festival Poster Contest
      • Film Festival American Graduate Strand
      • Other Filmmaking Opportunities
    • Instructional Technology Toolbox >
      • Positive Behavioral Interventions and Supports (PBIS)
  • Contact Us
    • Who do I ask?

Preparing for the Canyons District Film Festival

Picture
As you prepare your entry for the Film Festival, there are some simple and important things you can do to make sure your film is the best it can be. This page has helpful tips and information for filmmakers on the following topics:
  • Storyboarding
  • Filming
  • Editing
  • Interviewing
  • Copyright
  • Audio
  • External Sound Clips
  • Images
  • Lighting
  • Credits & Citation
Picture
Film Festival Home

Tools and Tips for the Filmmaking Process

Picture

Storyboarding

Creating a storyboard is an essential part of any film/video project because it helps you organize your story in a way that allows it to make sense to your audience. It allows you to organize your ideas as well as the media you will use. Here are some sites that can help you with the storyboarding process:
  • Wikipedia Entry–Storyboards
Here are some sample storyboards. You can make your own easily using word processing software. You can also use ComicLife to storyboard.
  • Bernajean Porter's Storyboard Template
  • Simple Video Storyboard
  • HRW Storyboard Template
  • Video Storyboard from Home Education Exchange
Creation of storyboards can tie into any core curriculum you and your students are studying!
Picture

Editing Techniques

There are many tools available to help you edit your film. Some common tools include iMovie, Final Cut Pro, and Adobe Premiere. Some simple alternatives include Adobe Spark and WeVideo.
When editing your film, consider how you might effectively use the following:
  • Cutting and editing footage to include the best shots and keep the film moving along smoothly
  • Titles
  • Graphics
  • Special Effects
  • Sound/Audio
  • Music
Check out this Ted-Ed video for some fun animation techniques and special effect ideas:
Picture

Copyright

Be sure that you only use materials in your film that you have permission to use. You must either pay the royalties for any music, photos, and other creative works borrowed from others or borrow works with express written permission, under fair use guidelines, or under a Creative Commons license. Please properly credit any creative works you use. For more information about copyright, please visit the Copyright, Creative Commons and Digital Citizenship and Online Safety pages of our site.
Film festival entries that break copyright, do not contain proper credits, or do not have proper media and information releases for each person involved in the film will not be considered for Canyons District Film Festival awards. If you have copyright and permissions questions, please contact your school's Educational Technology Specialist or email Katie Blunt at kathryn.blunt@canyonsdistrict.org.
Picture

Audio

Audio can be one of the most difficult aspects of taping. If you use only the camera microphone for audio you will have to keep the camera close to those doing the talking. You will also need to have them speak up. Here are some tips:
  • Keep your subject close to the camera.
  • Eliminate background noise as much as possible.
  • Use an external microphone if possible.
  • Make sure the microphone is out of the camera’s view.
  • Use headphones to monitor the sound quality.
Picture

External Sound Clips

Sometimes you just don't have the sound or music you need for your project. Any music or sound effects you use must either be created yourself using tools like GarageBand, purchased by paying royalties to the copyright owner (purchasing on iTunes does not count), or borrowed with proper permissions. For more details, visit the Copyright page of our site.
One of the easiest ways to borrow audio for your film is by using royalty-free music or sound effects. Royalty-free means that the owner of the audio will let you use what they have created free of charge. Here are some popular royalty-free audio sources:
  • Find Sounds
  • iMovie's built-in audio library
  • GarageBand's built-in audio loops
  • Soundzabound (Contact your teacher or Katie Blunt to log in to Utah's free education account.)
  • YouTube Audio Library
  • Bensound
  • FreeSoundtrackMusic.com
Find more ideas on our Copyright page.
Picture

Images

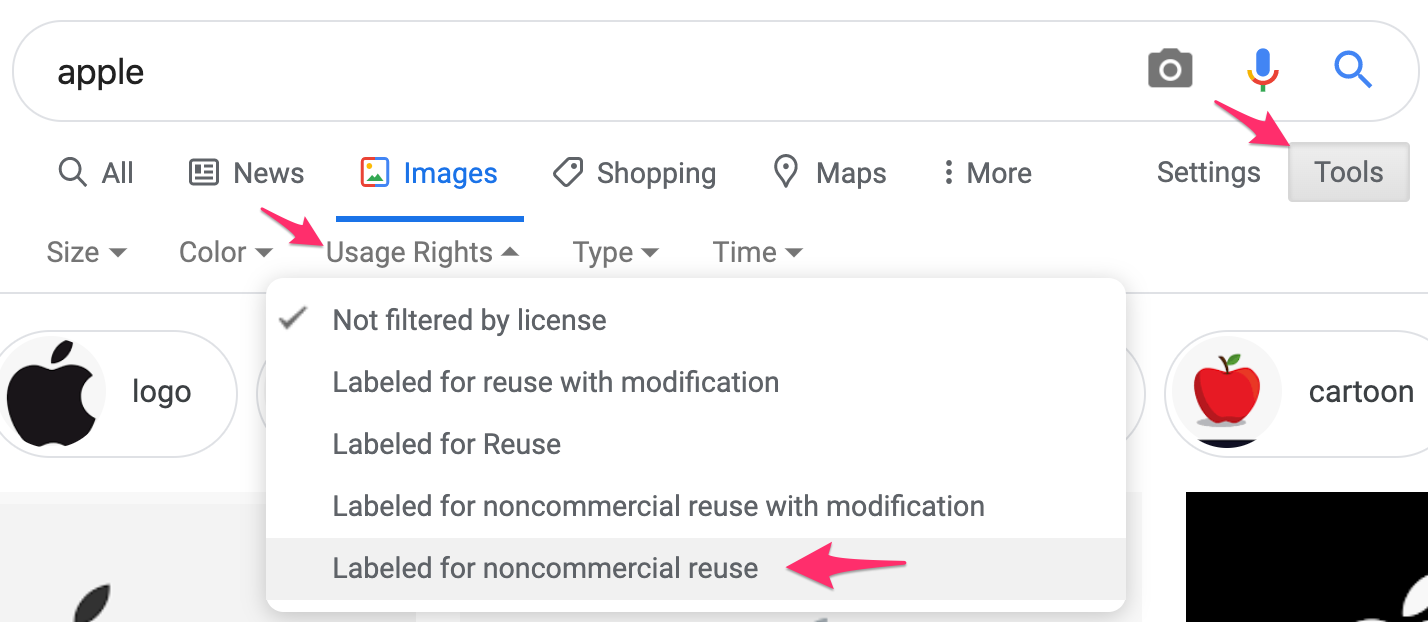
Sometimes you just don't have the photos you need for your project. Just like with audio, any photos you use must either be created yourself, purchased by paying royalties to the copyright owner, or borrowed with proper permissions. For more details, visit the Copyright page of our site.
One of the easiest ways to borrow images for your film is by using royalty-free photos. Royalty-free means that the owner of the image will let you use what they have created free of charge. Here are some popular royalty-free audio sources:
  • PhotosforClass.com
  • The Noun Project
  • FlatIcon
  • Google Search using the "Usage Rights" tool
Picture
Find more ideas on our Copyright page.
Caution: You must always be careful when searching for images. If you are an elementary student, ask an adult to help you search for safe photos.
Picture

Filming Techniques

The footage you shoot is a key part of any film project. Here are some tips for gathering quality footage:
Clear, Steady Footage:
  • Use your camera’s image stabilization feature, if it has one.
  • Use a tripod whenever possible. You can even build one of your own!
  • If no tripod is available, hold your bent arm tight against your body or lean against a solid surface to stabilize the shot.
  • If you're not skilled with using a camera, start by using your camera’s auto focus mode, unless it’s having trouble focusing on your subject.
  • It's usually best if you do not move your camera around to follow what you're filming. Instead, hold your camera still, and have the subject you're filming provide motion. 
Think About Composition:
  • Always film in landscape, not portrait.
  • Make sure all parts of your shot work together — the subject, background, color, and lighting.
  • Position your subject off center for a more interesting shot. Follow the Rule of Thirds.
  • Move in closer to make sure there is no unnecessary space around the subject.
Don't Forget the Background:
  • Keep the background simple.
  • Include a few props that will make the shot more interesting but not distract from the subject.
  • Make sure there are no distracting objects in the camera’s view.
  • Check that objects don’t look like they’re growing out of your subject.
Get Great Shots:
  • When possible, move your camera closer instead of using the zoom. Only use your zoom to quickly switch between close-up and wide shots.
  • Try to get at least two types of camera shots for each scene you film: close-up, medium, or wide.
  • Use extra video cameras so you can capture the same shot from different points of view.
  • Anticipate the action so you get the shots you need.
  • Record a few seconds before and after a scene so it will be easier to edit.
Capture Candid Shots:
  • Make your subjects feel comfortable and relaxed by talking and interacting with them.
  • Try to be discreet.
  • Bring along a digital still camera so you can incorporate still photos into your movie.
Additional Resources:
  • Apple's 10 Tips for Capturing Great Video: apple-digitalmovie-tips.pdf
Picture

Interviewing Techniques

Interviewing skills are particularly important for students creating documentary or newscast film projects.
"A video interview can be thought of as a conversation involving three types of people:
  • The interviewer is the facilitator. (S)he chooses the topic of conversation, asks questions, and guides the discussion.
  • The guest is the subject of the interview. (S)he will do most of the talking and get most of the camera shots.
  • The viewer is a silent observer who has been invited into the conversation.
This creates a three-way interaction. A successful interview will include all three groups in the correct mix.
"Typically, the interviewer begins by setting the scene. They invite the viewer into the conversation by introducing the location, guest and topic. At this point the interviewer is probably speaking to the camera as if they were looking the viewer in the eye.
"Next, the interviewer turns to speak to the guest. Then follows a fairly one-sided conversation in which the interviewer asks questions which are (usually) designed to encourage the guest to talk a lot.
"The way the interview progresses will depend on the situation. A short interview will last long enough to get the information from the guest and then close, often quite abruptly. A more in-depth or personal interview will usually go through a settling-in stage where simple facts are discussed, then move gently towards the more thorny issues.
"The interview is usually concluded by thanking the guest. The interviewer may then turn back to the camera and say goodbye to the viewer, as well as tidy up any script requirements such as leading to the next piece in the program."
-From Media College.com
Picture

Lighting

Lighting is one of the most important elements when making a video. Here are some tips for quality lighting:
  • Indoor, fluorescent lighting can be difficult. If there are windows available, get as much light from them as possible.
  • Do not put subjects to be filmed in front of windows. They will be nothing but shadows on the tape.
  • Before shooting, determine where the light is coming from (front, side, or back). If backlit, add more light so the front of your subject is lit, or move to another location.
  • Use a bounce card or lighting reflector to reflect light onto your subject instead of shining it directly on them.
  • If necessary, set your camera mode to match your shooting conditions. Cameras have a "white balance" setting that helps so your shots don't look too blue or too orange.
  • Avoid bright sunlight and make sure the camera operator's shadow isn't in the shot.
  • Shooting in the dark does not work with the average camera. Add enough lighting to your nighttime or dark shots to allow us to still see what is happening.
Picture

Credits & Citations

You must include proper credits, citations, and attribution in your film, particularly when you borrow sound or images from others. Simply listing a website or "Google.com" in your credits is not enough. Following are examples of proper ways to credit the creators of media you have borrowed.
Royalty-Free Citation Examples:
  • Royalty-free music courtesy of Soundzabound.com, "A Little Reggae" by Soundzabound
  • Royalty-free icons made by Freepik from www.flaticon.com
  • Royalty-free image from of Flickr.com, "Bitten Apple" by DLG Images
Creative Commons Attribution Example:
  • "Creative Commons 10th Birthday Celebration San Francisco" by tvol is licensed under CC BY 2.0
Remember, just because you purchased a song on iTunes or someone else used the song on YouTube, does not mean you have permission to use the song in your film. Refer to our Copyright page for more information.
Documentarians have some special rules for using information they have researched or media they happened to record during filming. Always cite your research sources in your credits. For more information about what you're allowed to include in your documentary, this resource from CMSI might help. It's pretty advanced stuff, so ask for help if you need it.
Icons made by Freepik from www.flaticon.com
Powered by Create your own unique website with customizable templates.


Our mission is to improve teaching and learning through the use of appropriate technologies,
supporting students in their progress toward college-, career-, and citizenship-readiness.

Creative Commons License

Original content distributed on this website is licensed under a
Creative Commons Attribution-Noncommercial-Share Alike 3.0 United States License.